
Getting started
This chapter takes you from installation to a first working session. If Logonomic is already installed, start with First launch.
Contents
- Prepare your computer
- Install or unpack Logonomic
- First launch
- Complete a first working session
- Understand the workspace
- What persists
- Features by edition
- Activation and updates
- Choose the right next chapter
Prepare your computer
Logonomic runs on Windows and Linux. Choose the installation steps below for your operating system and package format.
You will need Git, at least one local repository, and any coding-agent tools you
plan to use. Make sure git and your agent commands work in a shell under the
same account you use to start Logonomic. Sign in through each provider's CLI
before configuring its launcher.
For built-in hosting and CI integration, install and sign in to the matching hosting CLI separately. Logonomic does not bundle or install these tools:
| Integration | Required tool | Logonomic editions |
|---|---|---|
| GitHub.com repositories and Actions | GitHub CLI (gh) | Logonomic and Logonomic Pro |
| GitLab.com repositories and CI | GitLab CLI (glab) 1.87 or newer | Logonomic and Logonomic Pro |
| Self-managed GitLab | GitLab CLI (glab) 1.87 or newer | Logonomic Pro |
These hosting CLIs are separate from Git and your coding-agent tools. Ordinary Git work, including Logonomic Free, does not require either hosting CLI. Make the required command available on Logonomic's PATH, then follow Connect GitHub or GitLab for sign-in and access checks. Restart Logonomic after installing a CLI or changing its PATH.
If you need a repository, clone it with Git or your hosting service's tools. Logonomic will discover it once you add the folder containing it.
When a feature needs a Git capability your installation lacks, Logonomic names the missing capability and the Git executable it used. Update that Git installation to resolve the warning.
Install or unpack Logonomic
Get your package
Check Release status for package availability and guide coverage before following these instructions.
For Logonomic Free, use the downloads page to choose a package for your operating system.
For a retail edition, start from Editions and pricing. Invoice orders are offered to EU business customers. Confirm package availability for your operating system before ordering.
After payment clears:
- Open the access email sent to the designated licence holder. Its link opens your account or asks you to claim the purchase.
- If the claim page offers Open sign-in, keep that tab open and use the button to open the account page. Enter your email address, select Send sign-in link, and follow the sign-in email.
- Return to the claim tab. A successful claim shows Your purchase is now linked to this account. Purchases already linked to your account do not need another claim.
- Open Your downloads. Choose the eligible package for your edition and operating system; each download identifies its release and package format.
Download Logonomic or Logonomic Pro according to your purchase. Each edition has its own package; a retail licence does not turn the Free application into a retail edition.
If a claim link has expired or cannot be used, sign in and open the claim page. Select Request a new access email when offered. If a completed purchase is missing, refresh the account page after claiming it. No installer downloads are available means the account has no eligible package to offer. Contact Logonomic support with your order reference, edition and operating system if the purchase or download remains unavailable.
Windows installer
Run the installer normally and let it request administrator permissions when
needed. Choose the destination and complete setup, then open Logonomic from
the Start Menu or the installer's final page. The default destination is the
64-bit applications directory under Varinomics\Logonomic.
If you are replacing an installed copy, follow Activation and updates below. Installing in a different folder still shares Start Menu shortcuts and default user settings; use a separate profile when you need independent Logonomic settings and history.
Windows portable package
Extract the entire package into one directory and start its top-level
logonomic.exe. Keep logonomic_runtime and the supplied Soter recovery files
with it.
Portable packages use the same per-user data locations as installed copies. To
keep Logonomic data in a location you choose, both retail editions support
--user-data-dir. External
agent tools use their own profile locations.
Linux .deb package
The Linux packages target x86-64 (Intel/AMD) systems with glibc 2.39 or newer.
The .deb package baseline is Ubuntu 24.04; check the package's requirements
before using another distribution.
-
Download the
.debfor your edition. -
In a terminal, change to the download directory and install it with the command below, replacing
package.debwith the downloaded filename:sudo apt install ./package.deb -
Review and accept the licence terms when prompted. The package manager installs the required dependencies; retail editions also set up the activation service.
-
Open Logonomic from your applications menu. Its installed executable is
/opt/varinomics/Logonomic/logonomic.
Before replacing or removing a package, close Logonomic and end its terminal
sessions. Install a replacement .deb using the same command with the new
filename. The edition packages share one installation location, so remove the
installed edition before switching to another.
Linux AppImage
Use the same x86-64 and glibc requirements as above. In your download directory,
replace Logonomic.AppImage below with the downloaded filename:
chmod +x ./Logonomic.AppImage
./Logonomic.AppImage
Review and accept the licence terms on first launch. A retail edition can request administrator authorization to install the activation service. Run the application itself as your normal user.
The AppImage keeps a local copy of its files so terminal sessions can survive
the main window. Your settings and history use the normal
profile locations. To remove
the retained application copy, first end every terminal session and close
Logonomic, then run the same AppImage with --portable-remove.
First launch
- Open Paths in the title bar if Discovery Paths is not already visible.
- Add the parent directories where you keep your Git repositories.
- When they appear in Repositories, select the repository or worktree you want to use.
You can return to Paths whenever you need to change the scan locations. Closing Welcome dismisses the introduction for this profile.
If no repositories appear, check that the path exists, is accessible and contains a Git repository. Adding a discovery path does not initialize one. See Repositories and CI for exclusions and more discovery options.
Complete a first working session
This example uses a tiny local repository and a resumable coding-agent launcher. You will change one sentence, inspect its diff, remember the conversation, and return to it.
Prepare the example
Create a new empty folder named logonomic-example, outside your existing projects. Open a shell there and run:
git init
Create README.md with these two lines:
# Example project
This project demonstrates a small documentation change.
Commit the starting point:
git add README.md
git -c user.name="Example User" -c user.email="[email protected]" -c commit.gpgsign=false commit -m "Add example README"
The identity applies to this example commit. In Logonomic, add the folder's parent under Paths, then select logonomic-example in Repositories. Choose an authenticated launcher that supports exact resume; see provider capabilities.
Change one sentence
Start the launcher in the selected repository. Enter:
In README.md, replace the second line with “This project demonstrates inspecting and resuming a small change.” Change no other file and do not commit. Tell me when the edit is saved.
Wait for the agent to finish. Open Worktree, right-click README.md, and choose Show Diff. The committed sentence appears on the left and the saved replacement on the right. Confirm that only this sentence changed. If it did not, ask the agent to correct the edit and inspect the diff again.
Keep this change uncommitted for the next tutorial. Closing a conversation does not undo repository edits.
Remember the conversation
Tell the agent:
Summarize what changed and note that the README edit is saved but uncommitted. We will check it again when I resume this conversation.
Use the terminal's Close and remember action. Remembering requires an identified, resumable provider conversation. If the action is unavailable, resolve the launcher's resume requirements before proceeding; a remembered activity record alone cannot recreate a conversation.
Return to the same work
Find the remembered entry in Sessions. Expand its details and check the working directory and provider conversation ID, then choose Resume. Wait for the provider to reopen the requested conversation.
Ask:
What did we change in README.md? Read its current contents and confirm whether that change is still uncommitted. Do not edit anything.
Compare the answer with Show Diff. You should be looking at the same saved file change and the same provider conversation. If the provider files, account, or worktree are unavailable, read the resume refusal and restore the missing prerequisite. Continue in starts a new conversation and is a different action.
Next, use this repository for a review and handoff.
Understand the workspace
The selected item in Repositories sets the location for new actions. Already-running terminals keep their own working directory and session when you select another repository.
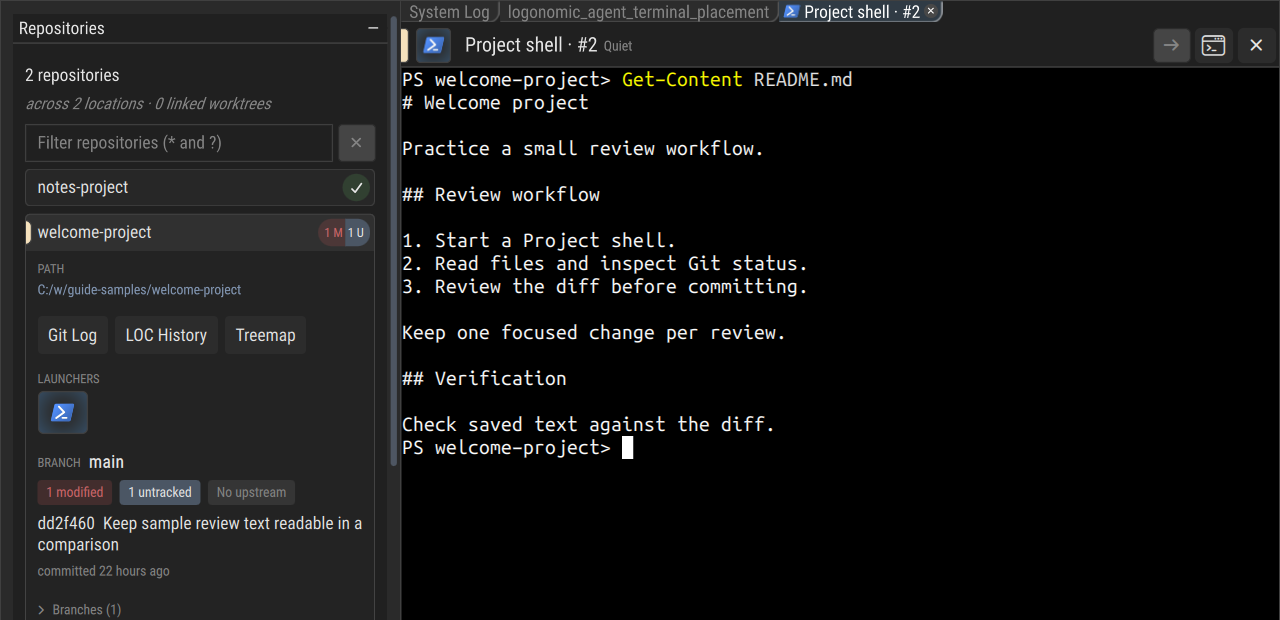
A Project shell reads the sample README and checks its working-tree changes in the selected repository. Select the image to view it at full size.
Use Launcher Configurations to start work and Sessions to return to it. The middle workspace holds terminal tabs and views such as files, diffs and the timeline. Session Log lists session activity and diagnostics; System Log holds application diagnostics. Read the conversation and command output in the terminal; Session Log is not a conversation transcript.
Drag panels and tabs to arrange the workspace. Show Sidebars/Hide Sidebars gives the middle view more room, while the title-bar shortcuts reopen tools such as Worktree, Search, Timeline and Token Usage. Hover over an icon to see its name. See Arrange the workspace for splits and layout controls.
What persists
Logonomic saves your layout, discovery paths, launchers, notes and session history in the active Logonomic profile. Repository files stay in their worktrees; provider credentials and conversations stay in the provider's own storage. See Back up the right data when you need to preserve all three.
By default, Logonomic keeps up to 1,000 stopped sessions, with additional protected context where needed. Its timeline keeps execution history separately. A remembered conversation can be resumed when its provider, account, saved conversation and working location remain available.
Every edition includes Soter for Logonomic. If the main Logonomic window crashes, Soter opens automatically with all surviving terminals still running. Close terminal ends one, while closing the Soter window leaves them running. See Recovery and troubleshooting for reconnecting a terminal or returning to Logonomic.
Features by edition
| Capability | Logonomic Free | Logonomic | Logonomic Pro |
|---|---|---|---|
| Live terminal sessions | Up to four | Unlimited | Unlimited |
| Local repositories, Git, files, comparisons and history | Included | Included | Included |
| Launchers, agent terminals, remembered sessions, notes, usage and timeline | Included | Included | Included |
Separate Logonomic profiles with --user-data-dir | Unavailable | Included | Included |
| Built-in GitHub.com repositories and Actions | Unavailable | Included | Included |
| Built-in GitLab.com repositories and CI | Unavailable | Included | Included |
| Built-in self-managed GitLab integration | Unavailable | Unavailable | Included |
| Android Companion with direct network connections | Unavailable | Included | Included |
| Soter for Logonomic crash recovery | Included | Included | Included |
Logonomic Free's four-session limit includes plain terminals. A stopped, remembered conversation uses no live slot; closing a terminal frees its slot once the session finishes exiting. Restarting ends the old session before starting its replacement.
The four slots count interactive terminals, including plain shells and coding agents. Noninteractive structured implementation/review tasks do not open terminal surfaces; they have a separate limit of four active tasks across the runtime in every edition. See Delegation limits.
Every edition can use ordinary Git with local checkouts from any Git host. The
edition distinctions above apply to Logonomic's built-in repository and CI
integration. Logonomic Pro connects to self-managed HTTPS GitLab instances
configured through glab; GitHub and GitLab offer different CI actions, described in
Repositories and CI.
Both retail editions include Android Companion and direct connections at no additional charge. Relay is a separate service for connections that cannot be made directly; it requires Relay access and a qualifying retail desktop licence on the same Varinomics Account. See Mobile Companion.
Provider subscriptions and Git hosting permissions are managed through those services separately from your Logonomic licence.
Activation and updates
Follow the activation instructions delivered with your retail-edition package. If your delivery does not include them, contact Logonomic support with your order reference, edition and operating system.
Retail desktop licences are perpetual and include twelve months of updates. You can keep using the latest version covered by your licence after that period; another year of updates can be purchased separately. Use Your downloads to obtain an update covered by your licence, then follow the replacement steps for its package format.
An activation failure at startup prevents the workspace from opening. A timeline-only activation failure leaves the rest of the workspace available. Keep the exact error details if you need support.
When changing computers, request a replacement activation through Logonomic support.
Replace a Windows installation
Finish your sessions and back up the files and conversations you need before removing an installation. Removal requires Logonomic and its terminal components to stop, so live terminals cannot continue through replacement.
The Windows offline installer replaces an existing copy through removal followed by a new installation:
- Start setup normally, without Run as administrator.
- If setup finds an installed copy at the initial destination, accept its offer to open the uninstaller. Setup closes; confirm removal in the uninstaller.
- Run setup again after removal finishes.
You can decline the offer and choose another destination. If setup refuses an
existing directory without offering removal—for example, after you change the
destination—open that copy's logonomic_maintenance.exe yourself. An installer
that was started as administrator also requires you to open the maintenance
tool yourself or restart setup normally.
Choose the right next chapter
- Repositories and CI covers repository discovery, worktrees and hosting integrations.
- Launchers, accounts and add-ons helps you configure agent commands and multiple accounts.
- Terminals covers daily terminal use and overview controls.
- Sessions and coordination covers saved conversations, the timeline and delegated work.
- Settings and reference covers preferences, profiles, backups and logs.