
Terminals
Use a terminal to work in a shell or command-line agent, either in a repository tab, in the terminal overview, or in its own window. Moving a terminal between these views keeps the same program running.
For launcher setup, see Launchers, accounts, and add-ons. For saved conversations and session history, see Sessions and coordination.
Start a terminal
- Select and expand the repository or worktree where you want to work.
- Select a launcher tile.
- Wait for the shell or agent prompt, then click inside the terminal to type.
The launcher supplies the command, runner, and account environment; the selected repository supplies the working directory. Install and sign in to any required CLI on the desktop before launching it.
To add a plain shell, open Launcher Configurations, select New launcher
(+), name it, choose a runner, and leave Script empty. On Windows, the
PowerShell runner opens Windows PowerShell (powershell.exe), and Command Prompt
opens cmd.exe; on Linux, bash opens bash. Direct requires a command. For
PowerShell 7, for example, use Direct with pwsh after installing it. Launcher
changes save automatically. Close the editor and select the new tile under a
repository.
Read the terminal header
The header identifies the terminal, its account, and its current activity. Hover over a shortened label or icon for details. The tab tooltip also includes the repository path, creation time, and an agent summary when available.
Title and note
Click the editable title to add a note of up to 120 characters. Press Enter or move focus away to save; Esc cancels. Enter returns focus to the terminal.
An integrated agent can supply its own title and summary. If a title has not arrived, its tooltip indicates whether the title integration has been observed or an update is still pending.
Status and attention
Working indicates agent activity, Needs you calls for an answer or permission, and Ready indicates that the agent is ready for input. Read the program's prompt before responding. Other labels help when that information is incomplete or the terminal has stopped:
| Status | Meaning |
|---|---|
| Preparing, Starting | Wait for the terminal to open or report a failure. |
| Running | The program is running; its agent phase may not be known. |
| Output, Quiet | Output is arriving, or no recent output was observed. Quiet does not mean finished. |
| Unknown, Unavailable | Current agent or process information is missing. |
| Error, Failed | Read the detailed message and the terminal's last output. |
| Interrupted, Stopped, Cancelled | Work stopped; inspect the output for context. |
| Exited, Closed | This terminal run has ended. |
A status marked inferred is based on observed activity. An unread-message count refers to coordination messages, rather than unread terminal lines.
Token usage
When session usage is available, the header shows a token count. Hover over it for its source and last-read information. An absent count means no usage record is available. For Codex, the session count covers completed turns and excludes the turn underway. See Usage, notes, and insights for account totals, estimates, and quotas.
Enter, copy, and paste text
Click inside the terminal to give it keyboard focus. Ordinary typing and terminal commands go to the running program; a focused search field or dialog receives typing instead.
Selecting and copying
Drag with the left mouse button to select text. If an editor or other terminal program handles the mouse, hold Shift while dragging to select locally. Click without dragging to clear the selection.
Ctrl+C copies a copyable selection and clears it. Without one, Ctrl+C goes to the program, usually to interrupt the current command. A subsequent Ctrl+C after copying can therefore interrupt work; highlighted blank space may contain nothing to copy.
For automatic copying, set Copy on selection (this terminal) in that terminal's settings. It overrides the saved default for that live terminal. Use Copy on selection (default) in Terminal settings opened without a live terminal to choose the default for future launches.
Pasting
Use Ctrl+V or Ctrl+Shift+V. Right-click also pastes unless the running program handles the mouse event; Shift+right-click uses local paste even then. Check the clipboard before right-clicking: this is a paste gesture, not a context menu. Pasted newlines can execute commands immediately.
Touch selection
Long-press text to select a word, adjust the handles, and choose Copy. Drag a handle toward an edge to scroll through retained text. A long press where there is no selectable word offers Paste. Tap away to dismiss the controls.
Open a hyperlink
Use Ctrl+click on a hyperlink supplied by the terminal program. Web links
open in your default browser; mailto: links open in your mail application.
To copy a hyperlink's destination, hold Ctrl+Shift and right-click its text, then choose Copy link address. For a plain-text URL, select and copy the URL.
Scroll and search terminal output
Scrollback
Scroll inside a terminal to read older output. If the running program handles the wheel, use the terminal's scrollbar instead. Drag it to the bottom to return to the newest output. Page Up and Page Down scroll normal terminal history by a screenful when available; otherwise, they reach the running program. Full-screen editors can behave differently.
Each terminal retains up to 64 MiB of output by default. You can reduce this to 1–64 MiB in Terminal settings. When the budget fills, the oldest output is discarded. Reducing it can discard output immediately, and increasing it later cannot restore that text. Remembering a conversation does not save an unlimited copy of terminal scrollback.
Search
- Focus the terminal and press Ctrl+F.
- Enter literal text. Match case starts enabled; clear it to include text with different letter case.
- Press Enter, F3, or Ctrl+G for the next match; add Shift for the previous match. The arrow buttons do the same.
- Press Esc or the search bar's close button to return to the terminal.
Search wraps between the last and first matches. It reports the match count, No matches, or Unavailable. It cannot recover discarded scrollback or earlier full-screen displays. Reopening search selects the query for replacement.
Row timestamps
Hover over an output row to see its timestamp (yyyy-MM-dd hh:mm:ss). This
records terminal output, rather than when a command began. Turn off Row
timestamp tooltip in Terminal settings if it gets in the way.
Use terminal overview
Select Show terminal overview in the title bar to work with running terminals across repositories. Click any tile to type into it. Close terminal overview returns to the repository workspace.
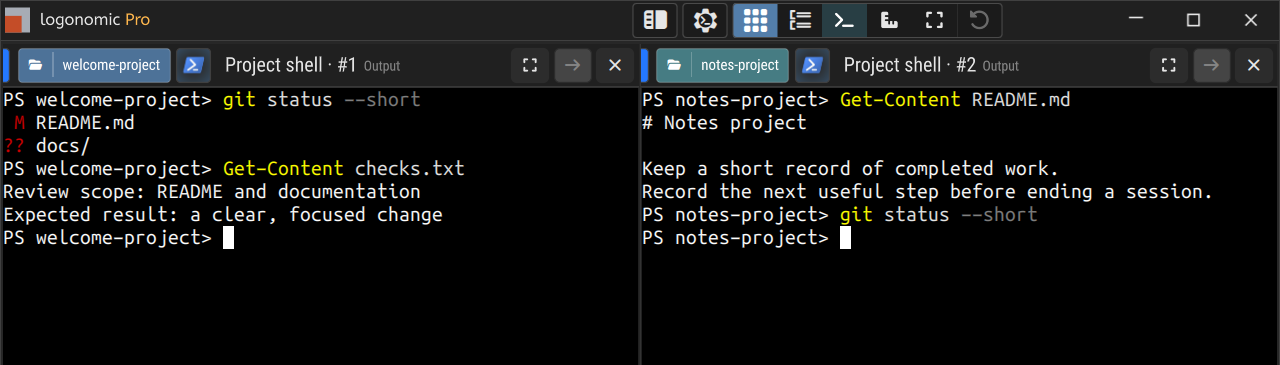
Terminal overview shows two Project shells from different sample repositories side by side. Select the image to view it at full size.
Terminals in separate windows stay there. Ended sessions belong in the Sessions history; a plain terminal can also be hidden by the overview filter.
Group and filter
Use Do not group terminal sessions by repository to switch off the default grouping, or Group terminal sessions by repository to restore it. Groups follow repository-path order, with terminals initially ordered by start time. Ungrouped terminals follow start time across the whole overview.
Select Hide plain terminals from the overview to concentrate on agent terminals, or Show plain terminals in the overview to include them again. Hiding a terminal leaves it running. Grouping and filtering preferences are saved.
On a tile's repository badge, select the name to return to that repository in the workspace, or its folder icon to open the directory in your file manager. Hover for the full path.
Choose a minimum tile size
| Preset | Minimum size |
|---|---|
| Compact | 480 × 270 |
| Standard | 640 × 360; default |
| Large | 960 × 540 |
| Custom | Width and height from 1 to 32767 each |
For Custom, enter both dimensions and select Apply or press Enter. Sizes use logical pixels and are saved. Scroll to reach tiles that do not fit.
Scroll the overview or an individual terminal
| Gesture | Scrolls |
|---|---|
| Wheel over a terminal | Terminal output, or the running application's content. |
| Wheel over headers, gaps, or overview controls | The overview. |
| Alt+wheel, including over a terminal | The overview vertically. |
| Shift+wheel or Alt+Shift+wheel | The overview horizontally. |
| Outer overview scrollbar | The overview. |
| A terminal's own scrollbar | That terminal's output. |
Horizontal trackpad scrolling also moves the overview.
Resize, reorder, and reset tiles
Drag a boundary between neighboring tiles to change their widths, or a row or group boundary to change heights. Minimum tile sizes still apply. The program inside a resized terminal may redraw or reflow its output.
Drag a tile by its header onto another tile in the same repository group to reorder it. Turn off grouping to reorder across the combined set. This does not change a terminal's working directory.
Restore automatic overview arrangement resets manual sizes and ordering and returns scrolling to the top-left. Changing grouping or minimum tile size also rebuilds the arrangement. Manual sizes and ordering last for the current application session; grouping, filtering, and minimum-size preferences are saved.
Enlarge one terminal and use full screen
Use Enlarge terminal to fill the overview with one tile, then Return terminal to overview to restore the arrangement. Enlargement is offered when there is another useful layout, such as an overview containing several tiles.
F11 toggles overview full screen. Use F11 or the exit control to leave it; Esc remains available to terminal programs. Closing an overview that entered full screen also restores the ordinary window.
Move a terminal into a separate window
- Close terminal overview if it is open.
- Find the terminal's repository tab.
- Select Open terminal in separate window in its header.
The tab now says This terminal is open in a separate window. Use Return terminal to workspace in the new window's title bar to move the same session back. Wait for an active move or close to finish if the action is unavailable.
Closing the separate window closes that terminal, with the remember/forget choices below for an agent session. It does not return the terminal to the workspace. A failed close reports Terminal close failed with details.
A separate terminal can keep running after you close the main Logonomic window. Its Return action requires a connected workspace. If you intend to stop all work, close the separate terminals too. See Normal application close.
Stop, close, restart, or resume
End the program normally
Use the shell or CLI's exit command to end it normally. Ctrl+C usually interrupts work, although the program decides whether to cancel a command, stop a turn, or exit. After exit, the terminal can remain open so you can read its final output.
Close a terminal
Select the header's close button. A plain terminal closes directly. For an agent terminal, choose:
| Action | Result |
|---|---|
| Close and remember | End the run and retain its confirmed resumable conversation in Logonomic history. |
| Close and forget | End the run and forget its Logonomic session and associated timeline history. The provider's own conversation files remain. |
Close and remember requires a supported resumable conversation. Hover over a disabled action for the reason. Press Esc or click outside the menu to keep working. Once closing starts, wait for its result before acting again.
A supported conversation is also remembered after a natural or unexpected exit, unless it was forgotten. Remove in the Sessions list dismisses a remembered entry; it is distinct from Close and forget. See Sessions and coordination for history retention and removal.
Restart a stopped terminal
After the terminal stops, use Resume this conversation to reopen its exact supported conversation, or Start a new terminal session when resumption is unavailable. The tooltip can explain why a conversation cannot be resumed.
Both actions start a new run and need terminal capacity. A new session uses the launcher again without restoring the old command state or scrollback; resumption uses the CLI's saved conversation. Logonomic Free ends the old terminal before admitting its replacement.
Continue with a different launcher
For eligible sessions, Continue in… offers other launchers. Context transfer differs from exact resumption; follow Sessions and coordination for target selection and what carries forward.
Change terminal appearance
Open the title-bar Settings gear and choose Terminal settings (all terminals), or press Ctrl+, in a live terminal. Appearance changes take effect immediately and are saved for all terminals and future launches.
Choose a color-scheme preview and font. The default font is Ubuntu Sans Mono derivative vnm, at 13 px. Font sizes range from 6–72 px; Ctrl+wheel also changes the shared size by one pixel per step, except when Companion controls sizing.
Logonomic saves the color scheme and Invert brightness separately for light and dark mode. Defaults are Classic in dark mode and Solarized Light in light mode. Brightness inversion preserves hue. It switches off LCD subpixel rendering; enabling subpixel rendering clears inversion.
Other settings include the scrollback budget and row timestamps.
When Terminal settings opens without a live terminal, it shows Copy on selection (default). This saved default is initially off and applies to future launches. Changing it updates live terminals that have no local override. Press Ctrl+, in a live terminal to set Copy on selection (this terminal). Its choice applies to that live terminal and survives font, color-scheme and theme changes. New terminals use the saved default.
Cell width and effective font size
Cell width adjusts how characters fit the display's pixel grid:
- Adjust font size to device-pixel grid is the default and permits a small effective font-size adjustment.
- Snap upward (ceil) rounds cell width upward.
- Snap to nearest (may overlap) can overlap glyphs at some fonts and sizes.
Using … px shows an effective size that differs from the requested size.
Renderer availability
Automatic (MSDF preferred) is the default text renderer. If text looks distorted or overlaps, try Glyph only, a known monospace font, and a standard color scheme. Turning off LCD subpixel rendering uses grayscale smoothing. For a support report, note the font, size, display scaling, and whether Glyph only changes the problem. You can also copy version/build information from the settings window.
When the Companion controls terminal size
A connected Companion can size the terminal for the phone. The desktop then shows that same character grid at a fitted scale. While this is active, Ctrl+wheel or a pinch zooms the desktop view up to 4×, rather than changing the shared font size. Pan with a middle-button drag or Ctrl+left-drag.
Select Reclaim terminal sizing for this desktop tab to let this tab's size and font determine the grid again. The action requires a connected terminal and usable desktop view. See Logonomic Companion.
Editions and terminal capacity
| Edition | Terminal capacity |
|---|---|
| Logonomic Free | Four terminal slots |
| Logonomic | Unlimited |
| Logonomic Pro | Unlimited |
Moving or hiding a terminal leaves its slot occupied. Remembered entries do not use running slots, but resuming one does. If Logonomic Free refuses a new terminal, close one and wait for shutdown to finish before trying again.
These slots count interactive terminal surfaces. Noninteractive structured tasks have separate four-task capacity and do not use a terminal slot.
Crash recovery preserves the original surviving sessions; see Recovery and troubleshooting.
Common terminal questions
| Problem | What to do |
|---|---|
| A launcher fails to start | Check the reported error, executable, runner, working directory, and selected account. |
| Input delivery interrupted or ! in the header | Read the tooltip and inspect the program's prompt/output before retrying. An unconfirmed command may already have run. |
| Mouse unavailable | Read the warning; keyboard input may still work. |
| A hyperlink does not open | Check that it is a web or email link and that your system has an application for it. For a printed URL, select and copy the address. |
| A terminal is missing from overview | Check separate windows, the plain-terminal filter, and whether the terminal ended. |
| Return terminal to workspace is unavailable | Read its tooltip. The workspace may be disconnected, a move or close may be underway, or the terminal may already have returned or closed. |
| I want to bring a recovered terminal back from Soter | Reopen Logonomic and follow Returning a recovered terminal. |
Terminal shortcut reference
These shortcuts assume terminal focus unless stated otherwise.
| Shortcut or gesture | Action |
|---|---|
| Ctrl+C with copyable selection | Copy and clear selection. |
| Ctrl+C without copyable selection | Send Ctrl+C to the program. |
| Ctrl+V, Ctrl+Shift+V, right-click | Paste; right-click depends on application mouse handling. |
| Ctrl+Shift+right-click | Open Copy link address on an explicit link; do nothing elsewhere. |
| Shift+left-drag / Shift+right-click | Select / paste despite application mouse handling. |
| Ctrl+F | Search retained output. |
| Enter, F3, Ctrl+G in search | Next match; add Shift for the previous match. |
| Esc in search | Close search. |
| Ctrl+, | Terminal settings. |
| Ctrl+wheel | Shared font size, or desktop zoom when Companion controls sizing. |
| Page Up, Page Down | Scroll normal-screen history when available; otherwise reach the application. |
| Alt+wheel in overview | Scroll overview vertically. |
| Shift+wheel, Alt+Shift+wheel in overview | Scroll overview horizontally. |
| F11 in overview | Toggle full screen. |
| Enter / Esc in the title editor | Save / cancel the note. |